Unlock Beauty: Master The Scalloped Crochet Edge For Stunning Projects
The art of crochet offers an endless array of decorative possibilities, and among the most beloved and versatile is the scalloped crochet edge. This charming embellishment transforms ordinary projects into extraordinary works of art, adding a touch of elegance, whimsy, or classic appeal. Whether you're finishing a blanket, adorning a garment, or adding flair to home decor, understanding how to create a beautiful scalloped edge is a skill every crocheter will cherish.
From delicate waves to bold, pronounced curves, the scalloped edge brings a unique texture and visual interest that can elevate any piece. It’s a technique that might seem intricate at first glance, but with a clear understanding of the basic stitches and a little practice, you’ll be adding these lovely borders to all your creations. This comprehensive guide will walk you through everything you need to know, ensuring your next project boasts a perfectly executed scalloped crochet edge.
Table of Contents
- What is a Scalloped Crochet Edge?
- Why Choose a Scalloped Edge for Your Projects?
- Essential Tools and Materials for Crocheting Scallops
- Mastering the Basic Scalloped Edge Stitch
- Exploring Advanced Scalloped Edge Variations
- Inspiring Project Ideas for Your Scalloped Edges
- Troubleshooting Common Scalloped Edge Issues
- Caring for Your Beautifully Crocheted Edges
What is a Scalloped Crochet Edge?
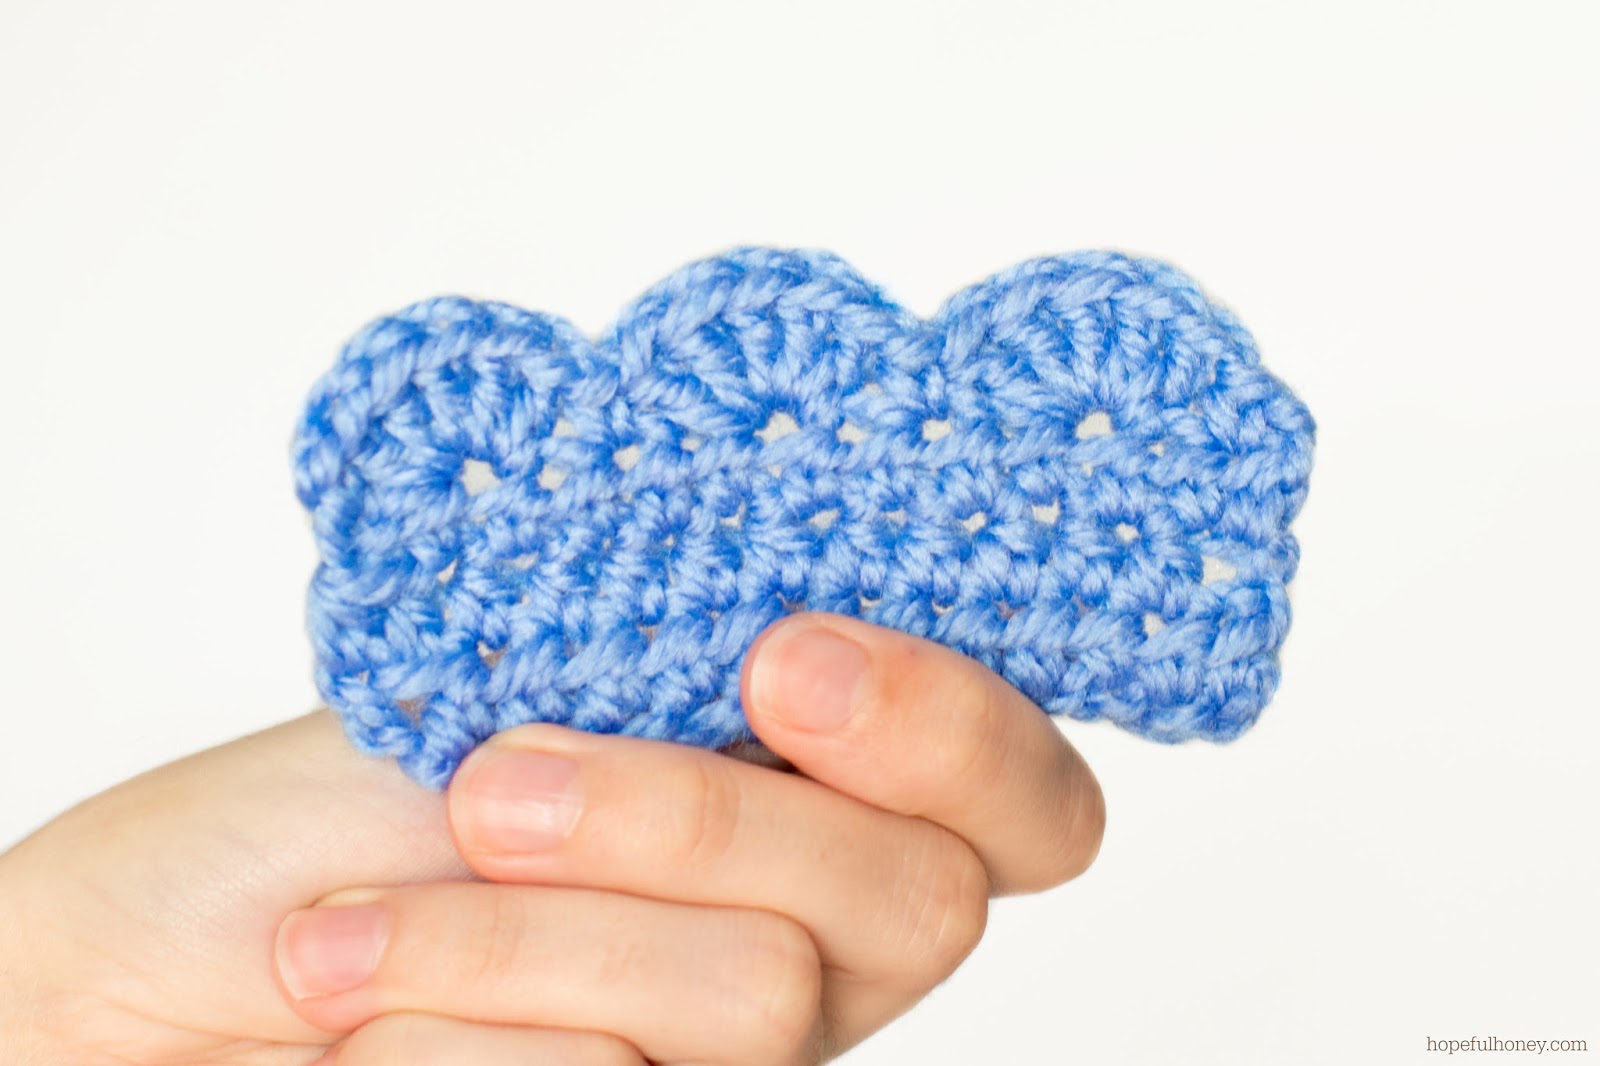
At its heart, a scalloped crochet edge is a decorative border created by working a series of stitches into the same stitch or space, forming a curved, shell-like shape. These "scallops" are then repeated across the edge of your fabric, creating a continuous wave pattern. The beauty of this technique lies in its simplicity and versatility. While the most common scallop involves a group of double crochet (dc) stitches, variations abound, using single crochet (sc), half double crochet (hdc), or even treble crochet (tr) to achieve different sizes and textures of waves.
Historically, decorative edges have been a staple in textile arts, adding both strength and beauty to finished pieces. The scalloped edge, with its organic, flowing lines, evokes a sense of timeless charm, reminiscent of antique linens, baby blankets, and delicate lace. It’s a fundamental finishing technique that every crocheter encounters, offering a satisfying way to complete a project and give it a polished, professional look. The visual appeal of a well-executed scalloped crochet edge is undeniable, turning a simple rectangle of fabric into a piece with character and flair.
Why Choose a Scalloped Edge for Your Projects?
Beyond its aesthetic appeal, incorporating a scalloped crochet edge offers several practical and creative advantages for your projects:
- Enhanced Aesthetics: The most obvious benefit is the immediate visual upgrade. A scalloped edge adds a soft, organic line that can complement almost any design, breaking up straight lines and introducing a touch of elegance or playfulness.
- Professional Finish: A well-executed border gives your handmade items a polished, store-bought quality. It hides any unevenness in the main fabric and provides a clean, defined edge.
- Versatility: From baby items and garments to home decor like placemats and coasters, a scalloped edge is incredibly adaptable. It can be delicate and subtle or bold and prominent, depending on the yarn weight, hook size, and stitch combination used.
- Structural Integrity: Edges often bear the brunt of wear and tear. A crocheted border, especially one with multiple stitches like a scallop, can add strength and durability to the fabric, preventing stretching or fraying.
- Creative Expression: There are countless ways to vary a scalloped crochet edge. You can experiment with different stitch counts within each scallop, varying the height of the stitches, or even incorporating multiple colors to create unique effects. This allows for immense personal customization.
- Hides Imperfections: If your main project has slightly uneven edges or tension issues, a decorative border like a scallop can cleverly disguise these minor flaws, drawing the eye to the beautiful finish instead.
The decision to add a scalloped edge is often driven by a desire to elevate a project from good to great. It’s a small detail that makes a big impact, reflecting the care and craftsmanship put into the piece.
Essential Tools and Materials for Crocheting Scallops
Before you dive into creating your first scalloped crochet edge, ensure you have the right tools and materials on hand. The good news is that you likely already possess most of these if you're an avid crocheter:
- Crochet Hook: The size of your hook will depend on the yarn you're using and the desired density of your scallops. Generally, use the same hook size you used for the main body of your project, or one size smaller if you want a tighter, more defined edge.
- Yarn:
- Type: Any yarn type can be used for a scalloped edge, but consider the project's purpose. Cotton is great for items that need to be washed frequently (like dishcloths), while acrylic or wool works well for blankets and garments.
- Weight: The yarn weight will significantly impact the look of your scallops. Worsted weight yarn will create chunkier, more pronounced scallops, while fingering or lace weight yarn will yield delicate, intricate edges.
- Color: You can use the same color as your main project for a seamless look, or a contrasting color to make the scalloped edge pop and add a design element.
- Scissors: Essential for cutting yarn tails.
- Yarn Needle (Tapestry Needle): Crucial for weaving in ends neatly, ensuring your scalloped edge looks clean and professional.
- Stitch Markers (Optional but Recommended): These can be very helpful, especially when working on larger projects or if you're new to creating borders. They help you keep track of your stitch count and where to place your scallops.
- Measuring Tape (Optional): Useful for ensuring your scallops are evenly spaced, especially on long edges.
Choosing the right yarn and hook combination is key to achieving the desired look for your scalloped crochet edge. A common tip is to make a small swatch of your main fabric and then practice the scallop border on it to ensure you're happy with the tension and appearance before applying it to your main project.
Mastering the Basic Scalloped Edge Stitch
The foundation of almost all scalloped crochet edge patterns lies in a simple, repeatable sequence of stitches. Once you grasp this basic concept, you can easily adapt it to create a myriad of variations. The most common basic scallop uses double crochet stitches.
Understanding the Stitch Repeat
A basic scallop is formed by working a set number of stitches (typically 5 or 7 double crochets) into a single stitch or space, then skipping a few stitches, and anchoring the scallop with a slip stitch or single crochet before repeating the sequence. The "skip" creates the gap between the scallops, allowing them to curve gracefully.
For a standard double crochet scallop, the repeat often looks something like this:
(Skip X stitches, work Y DC into the next stitch/space, Skip X stitches, Sl St/SC into the next stitch/space) Repeat across.
Where X and Y are numbers that determine the size and spacing of your scallops. A common beginner-friendly repeat is (Skip 2 stitches, 5 DC into the next stitch, Skip 2 stitches, Sl St into the next stitch).
Step-by-Step Instructions for a Simple Scallop
Let's assume you're adding a scalloped crochet edge to a finished piece, and you've already worked a foundation row of single crochet around the perimeter if needed (this provides an even base to work into).
- Prepare Your Edge: If your project doesn't have a neat edge, work a row of single crochet (sc) evenly around the entire perimeter. This creates a stable foundation for your scallops. Join with a slip stitch (sl st) to the first sc.
- Starting the First Scallop:
- Chain 1 (this does not count as a stitch).
- Skip the next 2 single crochet stitches.
- Into the next single crochet stitch (the 3rd one from your starting point), work 5 double crochet (dc) stitches. All 5 dc stitches go into that *one* single crochet stitch. This forms your first scallop.
- Anchoring the Scallop:
- Skip the next 2 single crochet stitches.
- Slip stitch (sl st) into the next single crochet stitch. This anchors your first scallop and creates the dip between the waves.
- Repeating the Pattern:
- Skip the next 2 single crochet stitches.
- Into the next single crochet stitch, work 5 double crochet (dc) stitches.
- Skip the next 2 single crochet stitches.
- Slip stitch (sl st) into the next single crochet stitch.
- Continue Around: Repeat step 4 all the way around your project.
- Finishing: When you reach the beginning, join with a slip stitch to the first slip stitch of the round (or the starting chain-1 if you began that way). Fasten off and weave in your ends securely.
Important Note on Corners: When you reach a corner, you'll need to adjust the pattern slightly to ensure the scallop lays flat and doesn't pull. A common method is to work a scallop into the corner stitch itself, or to work a slip stitch into the corner and then adjust the skips on either side of the corner to accommodate the turn. Experimentation is key here; you might need to skip fewer stitches before or after the corner scallop, or even work a smaller scallop (e.g., 3 DCs) in the corner itself.
Exploring Advanced Scalloped Edge Variations
Once you've mastered the basic scalloped crochet edge, you'll find a world of variations waiting to be explored. These modifications allow you to create different textures, sizes, and levels of intricacy, truly customizing your project's finish.
The Delicate Picot Scallop
A picot stitch adds a tiny, decorative bump to your crochet fabric, and when incorporated into a scallop, it creates a wonderfully delicate and intricate edge. A common way to make a picot scallop is to add a picot stitch to the top of the center stitch of your scallop.
How to Make a Picot Stitch: Chain 3, then slip stitch into the 3rd chain from your hook (or into the top of the stitch you just made, forming a small loop).
Integrating into a Scallop (Example):
Follow the basic scallop instructions, but when you work your 5 DC into the designated stitch:
- Work 2 DC.
- Work 1 DC, then make a Picot (ch 3, sl st into 3rd ch from hook). This picot sits on top of the 3rd DC.
- Work 2 more DC.
- Continue with skipping stitches and slip stitching as in the basic pattern.
This creates a scallop with a charming little "crown" at its peak, perfect for baby blankets, delicate scarves, or elegant doilies. The visual interest added by the picot makes this scalloped crochet edge truly stand out.
Creating Deep, Pronounced Scallops
If you want a more dramatic, pronounced wave, you can create deeper scallops by using taller stitches or more stitches within each scallop, and by increasing the number of skipped stitches between them. This creates a bolder, more substantial edge.
Methods for Deeper Scallops:
- Taller Stitches: Instead of double crochet (DC), use treble crochet (TR) or even double treble crochet (DTR).
- Example: (Skip 3 stitches, 7 TR into the next stitch, Skip 3 stitches, Sl St into the next stitch).
- More Stitches per Scallop: Increase the number of stitches worked into a single point. Instead of 5 DC, try 7, 9, or even 11 DC.
- Example: (Skip 3 stitches, 9 DC into the next stitch, Skip 3 stitches, Sl St into the next stitch).
- Varying Stitch Heights within the Scallop: Create a more gradual curve by starting with shorter stitches, building to taller ones in the middle, and then decreasing back to shorter ones.
- Example: (Skip 3 stitches, SC, HDC, 3 DC, HDC, SC into the next stitch, Skip 3 stitches, Sl St into the next stitch). This creates a very organic, rounded scallop.
Deeper scallops are excellent for blankets, shawls, or items where you want the border to be a significant design feature. They add weight and a luxurious feel to the finished product. Experiment with different combinations to find the perfect scalloped crochet edge for your specific project.
Inspiring Project Ideas for Your Scalloped Edges
The versatility of the scalloped crochet edge means it can be applied to an incredibly wide range of projects. Here are some inspiring ideas to get your creative juices flowing:
- Baby Blankets and Afghans: This is perhaps the most classic application. A soft, gentle scalloped edge adds a timeless, comforting finish to any baby blanket, making it perfect for gifts. Deeper scallops can add a cozy, substantial feel to larger afghans.
- Scarves and Shawls: A delicate scalloped edge can transform a simple rectangular scarf into an elegant accessory. For shawls, it adds a beautiful drape and a refined finish.
- Garments (Sweaters, Cardigans, Skirts): Add a charming touch to the cuffs, necklines, or hems of crocheted garments. A small, tight scallop can give a vintage feel, while a more open one can add a breezy, summery vibe.
- Home Decor (Coasters, Placemats, Doilies): Elevate everyday items with a decorative border. Coasters with a scalloped edge are adorable and protect surfaces in style. Doilies, by their very nature, often feature intricate scalloped or shell patterns.
- Dishcloths and Washcloths: Even utilitarian items can benefit from a pretty border. A scalloped edge can make a simple dishcloth feel more special and handmade.
- Pillowcases and Bedding: Imagine pillowcases with a delicate scalloped trim, adding a touch of romance and softness to your bedroom decor.
- Edging for Fabric: Not just for crochet! You can crochet a scalloped edge directly onto fabric items like towels, burp cloths, or even curtains. Simply create a foundation row of single crochet by working into the fabric (punching holes with your hook or using a sewing needle to pre-punch) and then proceed with your scallop pattern.
- Bags and Purses: A sturdy scalloped edge can provide a nice finish to the opening of a crocheted bag or add a decorative element to the flap.
The key is to consider the overall aesthetic of your project and choose a scalloped crochet edge that complements it. A fine yarn and small hook will create a subtle edge, while a bulky yarn and large hook will produce a more pronounced and playful border.
Troubleshooting Common Scalloped Edge Issues
Even experienced crocheters can encounter hiccups when working on a scalloped crochet edge. Here are some common problems and how to resolve them, ensuring your border looks perfect:
- Wavy or Ruffled Edge:
- Cause: Too many stitches in your scallops, or not skipping enough stitches between scallops. This means your border is too long for the edge it's attached to.
- Solution: Reduce the number of stitches within each scallop (e.g., from 7 DC to 5 DC). Or, increase the number of stitches you skip between scallops. You might also try using a smaller hook size.
- Tight or Pulling Edge:
- Cause: Not enough stitches in your scallops, or skipping too many stitches between scallops. Your border is too short for the edge.
- Solution: Increase the number of stitches within each scallop (e.g., from 5 DC to 7 DC). Or, decrease the number of stitches you skip between scallops. You could also try using a larger hook size.
- Uneven Scallops:
- Cause: Inconsistent tension, or miscounting stitches/skips.
- Solution: Practice maintaining consistent tension. Use stitch markers to mark the anchor points or the center of each scallop, ensuring even spacing. Double-check your stitch counts for each scallop and the skips in between.
- Corners Don't Lay Flat:
- Cause: Not enough stitches to accommodate the turn.
- Solution: When you reach a corner, you often need to work extra stitches or a slightly modified scallop. Try working a full scallop into the corner stitch, or work a slip stitch into the corner and then adjust your skips on either side of the corner (e.g., skip 1 stitch before the corner, work scallop, skip 1 stitch after the corner). Experimentation is key here to find what works best for your specific pattern.
- Difficulty Identifying Stitches for Anchoring:
- Cause: The previous row isn't clearly defined, or you're working into spaces instead of stitches.
- Solution: If your main fabric edge is uneven, work a foundation row of single crochet evenly around the entire perimeter first. This provides a clear, consistent row of stitches to work your scallops into. Always ensure you're inserting your hook correctly into the stitch (under both loops) or the designated space.
Remember, crochet is a craft that benefits from practice. Don't be afraid to unravel (frog!) your work if it's not looking right. It's part of the learning process, and each correction brings you closer to mastering the perfect scalloped crochet edge.
Caring for Your Beautifully Crocheted Edges
Once you've put in the effort to create a stunning scalloped crochet edge, you'll want to ensure it stays beautiful for years to come. Proper care depends largely on the fiber content of your yarn, but here are some general guidelines:
- Check Yarn Label: Always, always refer to the yarn label for specific washing and drying instructions. This is the most reliable source of information for caring for your finished item.
- Hand Washing (Recommended for Delicates): For items with intricate scalloped edges or those made from delicate fibers like wool, alpaca, or silk, hand washing is often the safest bet.
- Fill a basin with lukewarm water and a gentle, pH-neutral detergent.
- Submerge your item and gently squeeze the water through the fabric. Avoid harsh scrubbing or twisting, which can distort the scallops.
- Rinse thoroughly with clean, lukewarm water until all soap is gone.
- Gently press out excess water, then roll the item in a clean towel to absorb more moisture.
- Machine Washing (for Durable Fibers): If your item is made from acrylic, cotton, or superwash wool, it might be machine washable.
- Use a gentle cycle with cold water.
- Place the item in a mesh laundry bag to protect the delicate scallops from snagging or stretching.
- Use a mild detergent.
- Drying:
- Lay Flat to Dry: This is the golden rule for most crocheted items, especially those with decorative edges. Lay the item flat on a clean, dry towel or a drying rack, shaping the scallops as needed. This prevents stretching and maintains the integrity of the border.
- Avoid Hanging: Hanging a wet crocheted item can cause it to stretch and distort, especially the scalloped edge, due to the weight of the water.
- No Tumble Drying (Unless Specified): High heat from a tumble dryer can shrink, felt, or damage many yarn fibers, and can cause the scallops to lose their shape. Only tumble dry if the yarn label explicitly states it's safe, and even then, use a low heat setting.
- Blocking: For the most professional-looking scalloped crochet edge, consider blocking your finished piece. Blocking is the process of wetting your crochet and then shaping it to its final dimensions as it dries. This helps open up stitch patterns, evens out tension, and makes your scallops lie perfectly flat and uniform.
By following these care instructions, your beautifully finished projects with their exquisite scalloped crochet edges will remain a source of pride and joy for many years to come.
Conclusion
The scalloped crochet edge is far more than just a finishing touch; it's a statement of craftsmanship, a nod to timeless design, and a testament to the endless creativity that crochet offers. From the simplest ripple to the most intricate picot-adorned wave, mastering this versatile technique opens up a world of possibilities for elevating your handmade projects.
We've explored what makes a scalloped edge so appealing, the essential tools required, and provided step-by-step guidance for crafting both basic and advanced variations. We've also offered inspiration for where to apply these beautiful borders and shared practical tips for troubleshooting common issues and ensuring your creations stand the test of time. Now armed with this comprehensive knowledge, you're ready to transform your crochet pieces with that perfect, elegant flourish.
Don't hesitate to pick up your hook and yarn and start experimenting. The joy of crochet lies in the journey of creation and the satisfaction of a beautifully finished piece. We encourage you to share your experiences and showcase your stunning scalloped edge projects in the comments below! What will you adorn with a scalloped edge next? Your creativity is the only limit!

Fiber Flux: How to Crochet Scallop Edging

How to Crochet: Scalloped Edging | Moogly | Crochet edging patterns
How To: Crochet A Scalloped Edging - Interweave
